Artificial Intelligence Series (Chapter 0): Local Deployment of Large Models
The Ice-breaking Topic
Why should we try to deploy the AI Models in my local environment?
Data Privacy and Security
Protecting Sensitive Data: When dealing with sensitive data (such as healthcare, finance, or personal privacy), deploying AI models locally can prevent data from being uploaded to the cloud, thereby reducing the risk of data breaches.
Compliance Requirements: Some industries have stringent regulations regarding data storage and processing, such as the GDPR in Europe, which encourages businesses to deploy AI models locally.
Latency and Performance
Reducing Network Latency: Deploying models locally can reduce the latency associated with data transmission, particularly for applications that require real-time or low-latency processing, such as autonomous driving or video surveillance.
High-Performance Computing: Local deployment allows full utilisation of local hardware resources, providing higher computational performance. The cloud may face limitations in bandwidth and computational resources, while local hardware can be optimised and tailored to the specific needs of the task.
Cost Control
Avoiding Cloud Service Costs: While cloud computing is flexible, it can become costly over the long term. Especially in scenarios with high computational and storage needs, local deployment can help businesses reduce their reliance on cloud resources and lower costs.
On-Demand Hardware Expansion: Businesses can purchase appropriate hardware resources as needed, avoiding the fixed costs of cloud service providers.
Control and Customisation
Complete Control: Deploying AI models locally ensures full control over both hardware and software, allowing businesses to customise and optimise the deployment environment to meet specific needs.
Flexibility: Companies have the freedom to choose the computing platform (e.g., GPU, TPU, CPU) and system architecture, enabling finer-grained optimisation.
Offline Operation and High Availability
No Reliance on the Internet: For certain application scenarios (such as remote areas or offshore platforms), local deployment ensures that the system continues to function without an internet connection.
High Availability: Local deployment reduces dependence on external cloud service providers, helping businesses avoid disruptions caused by network issues or cloud service outages.
Environment Adaptation
Optimising Hardware Resources: AI models deployed locally can be optimised according to the specific hardware environment (e.g., dedicated GPUs or custom hardware accelerators).
Reducing Shared Cloud Resources: Cloud platforms often share resources among multiple customers, which can lead to performance fluctuations. Local deployment can avoid this resource contention.
Deploying Large Models in local
Here, I would like to introduce how to deploy ollama by using docker.
In fact, there are many methods to deploy.
Eg. Install in pysical machine by using curl command in Linux, Download compressions and unzip the packages to install in Windows/MacOS operating system. What’s more, you could install ollama by pip as well.
More detailed information, please visit the ollama GitHub.
Deploying the Ollama
Deploying in docker
The official Ollama Docker image ollama/ollama is available on Docker Hub.
1 | # CPU Only |
About the docker knowledge, I have already introduced before. You could review here.
After pulling the image from DockerHub, you could use the command ollama -v to check the version of the current ollama.
1 | # Check the version of ollama |
Deploying in the physical machine
Different operating system has different methods to deploy ollama in physical.
Here, in this case we will use curl command for local deployment in Linux OS.
1 | # Download the deploy script from the official website and execute the installation shell |
After completing the download process, you could check the status of ollama service.
1 | # Use the systemctl command to check the service status |
Similarly, you could use the command ollama -v to check the version of ollama you have installed.
1 | # Check the version of ollama |
For even more information about downloading ollama, please refer to the official website.
Pulling the models from ollama library
There are plenty of models you could pull from the ollama library.
Please refer to your own server’s performance and configuration to choose the model.
Eg. 12 cores CPU + 32 GB Memory => deepseek-r1:8b is recommended.
1 | # Pull the model from the ollama library |
If you pulled the model successfully, you could use the command ollama list(ls) to confirm the result.
1 | ollama list/ls |
Interact with the local models
There are two ways to interact with local models.
Use the
ollama runcommand in CLI.1
ollama run [the model name:tag]
It will guide you in the CLI. You could use
ctrl+dor/byeto quit the interaction in CLI.1
2
3# Run the LLM in local as you specifiy
ollama run deepseek-r1:8b
>>> Send a message (/? for help)Visit and question in front-end website
open-webui.Deploying the
open-webuiin docker.1
2
3
4
5# If Ollama is on your computer, use this command
docker run -d -p 3000:8080 --add-host=host.docker.internal:host-gateway -v open-webui:/app/backend/data --name open-webui --restart always ghcr.io/open-webui/open-webui:main
# If Ollama is on a Different Server, use this command
docker run -d -p 3000:8080 -e OLLAMA_BASE_URL=https://example.com -v open-webui:/app/backend/data --name open-webui --restart always ghcr.io/open-webui/open-webui:mainDeploying the
open-webuibypip.1
2
3
4
5# Install
pip install open-webui
# Execute
open-webui serve
By the way, Deploying in docker is recommended.
Login and Question offline
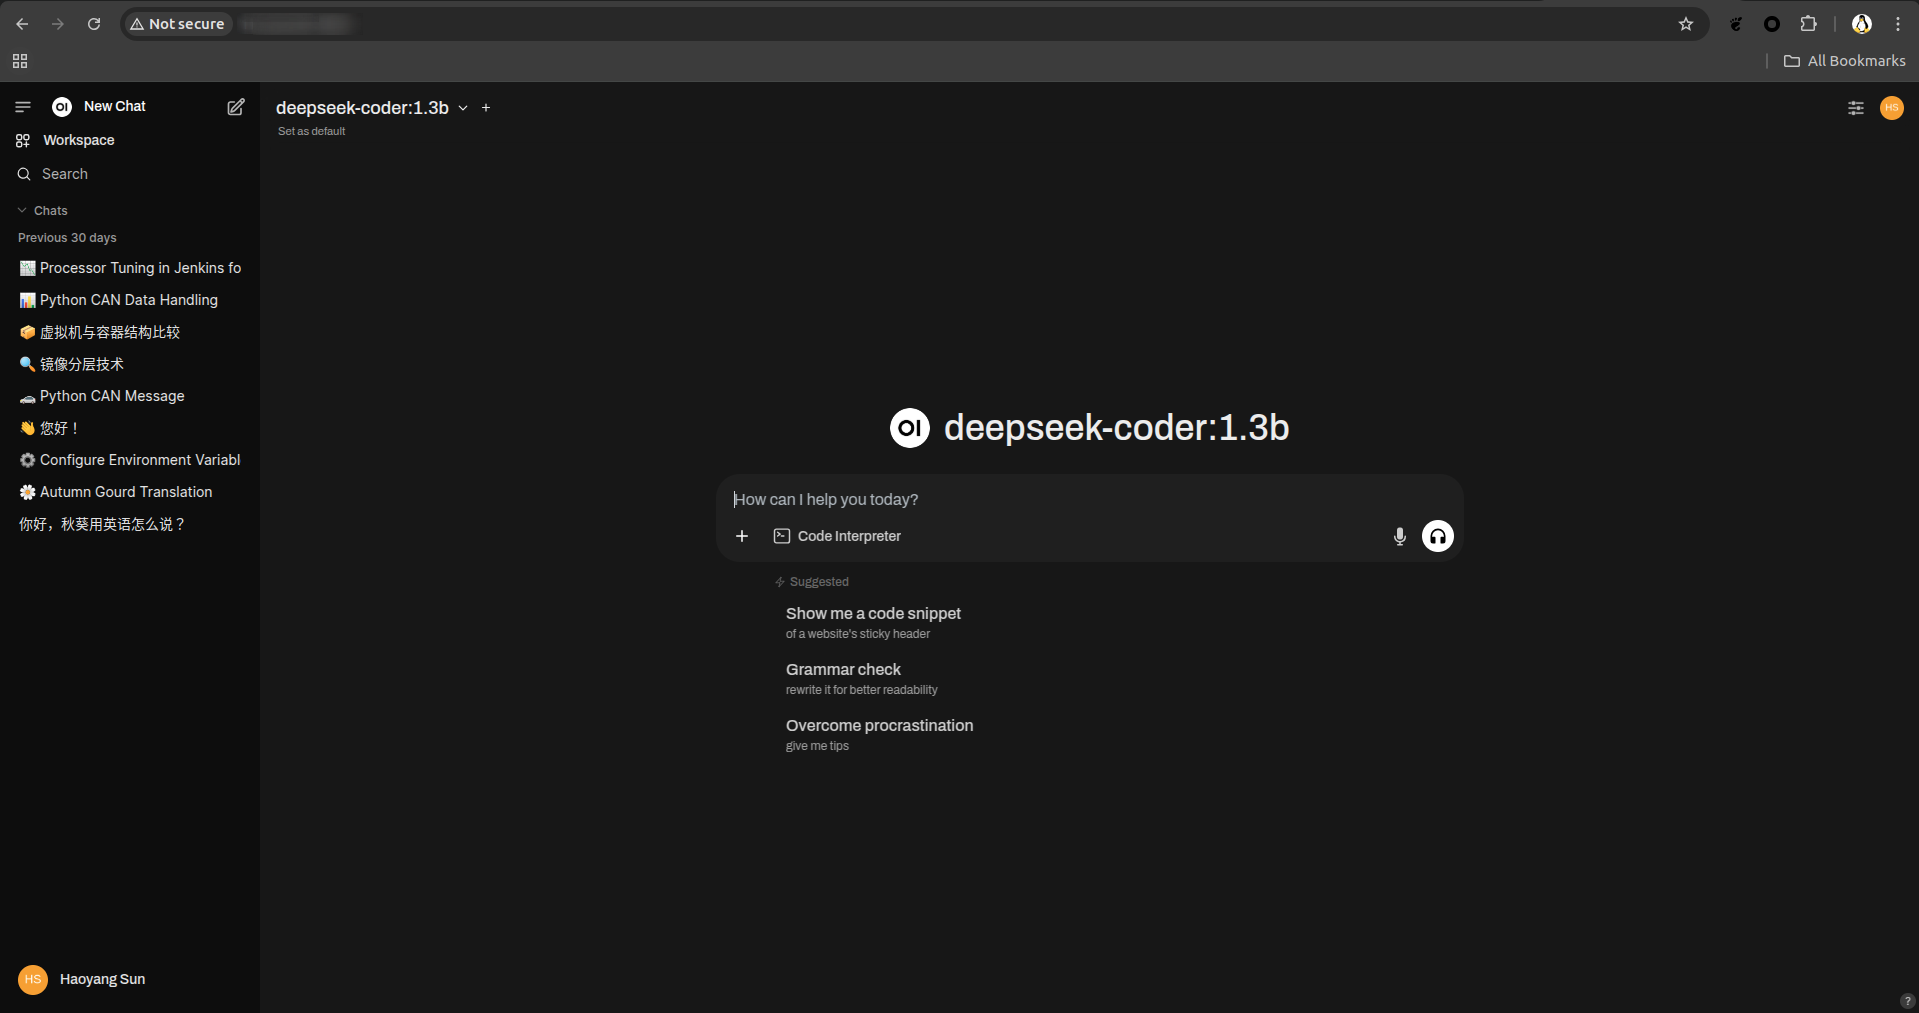
The final step for you here is to login the open-webui website and let’s question!
You could use http://ip:port or http://localhost:port to visit your local UI.
Set the administrator (name + email + password) and then you could login.
Selecting the various types of models you’ve already downloaded in local.
You could also select more than one model and compare the results at the same time.
The demo representation is shown as below.
Congratulations to you! Now you can have a good time experimenting with large models locally :)
 Wechat
 Alipay